
Following the Allied landings at Hollandia in April 1944, the air war in New Guinea rapidly shifted westward toward Biak, Wakde, Noemfoor, Manokwari and the Vogelkopf Peninsula. During April and May, U.S. Fifth and Thirteenth Air Force bombers and fighters pressed against increasingly scattered Japanese Army and Navy air forces. This second part of the After Hollandia series follows that changing air campaign through the invasion of Biak and the Japanese effort to reinforce western New Guinea ahead of Operation A-Go.
On April 30th a VB-106 PB4Y-1 was attacked by three Zekes while flying a patrol mission near Soepori Island.[1] The navy Liberator returned to its base at Momote, Admiralty Islands safely.
The following day another VB-106 Liberator sighted a sampan loaded with cargo approaching the harbor at Manokwari. Two strafing runs were made leaving the 100 ft. vessel listing and smoking. A fighter identified as a “Tojo” was seen taking off from the airfield. It made one halfhearted pass and broke off when fired upon by the bow and top turret guns. Two other fighters took off but were evaded in cloud cover. Pilot Lt. Allan Seaman then flew toward Biak Island to photograph airfields there. Spotting a 2,500 ton cargo ship, a low level bombing attack was carried out with a direct hit by a 500 lb. bomb claimed. The two fighters thought to be Tojos turned up again with each “tossing” a phosphorous bomb in the direction of the Liberator. Neither came close and the fighters broke off in the overcast without conducting a firing pass.[2]
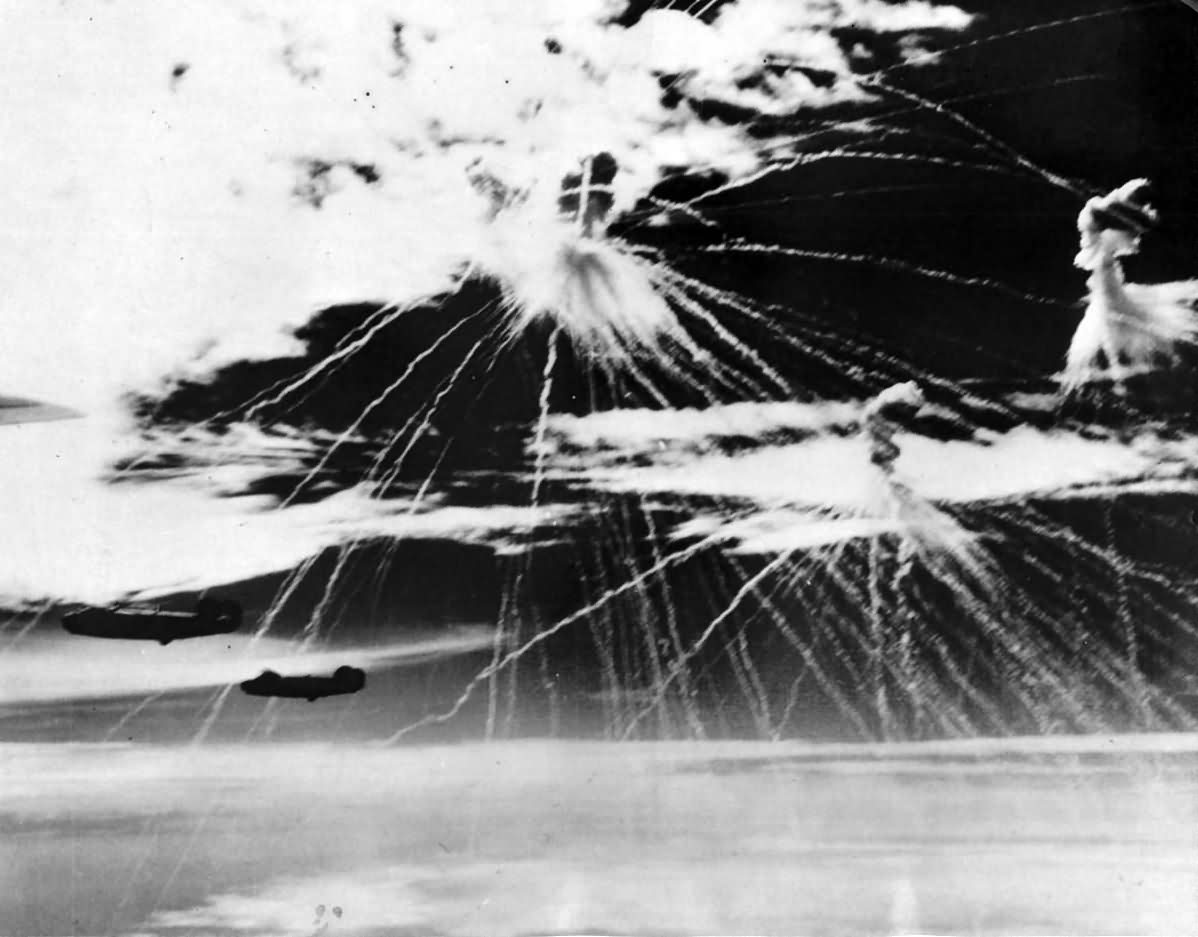
phosphorous aerial bomb
The report of the surviving members of the crew relates a further encounter with four Tojos, each carrying multiple underwing bombs. Allegedly up to twenty bombs were launched at the Liberator. Gunnery passes were also made. Pilot Seaman engaged in violent evasive maneuvers and gunners maintained fire on the attackers. Two were claimed destroyed. The Liberator suffered various damaging hits and eventually No. 3 engine caught fire, apparently damaged by a bomb. The PB4Y went into a shallow glide until crashing in the water. Pilot and co-pilot were killed in the crash. Three of the crew drowned. The others suffered various injuries but were eventually rescued by a VP-33 PBY. Crew members stated they were “certain” of the attackers’ identification as Tojos.
In contrast to the lurid details in the ACA account the translation of a Japanese report states: “An attacking B-24 was shot down over Biak by 4 Zeros.” [3]
The Air War Moves West from Hollandia
The nature of the air war over western New Guinea was changing. On the same day Lt. Seaman’s PB4Y was shot down a U.S. transport plane landed at Hollandia. The next day fighters landed and within a couple days two fighter squadrons were operating there. Soon Tadji was hosting fighters and attack aircraft. Before the month was out Wakde had fallen and Allied aircraft were operating from that base. Allied air power moved forward hundreds of miles. For the time being the Japanese navy maintained a presence on Biak with fighters and reconnaissance aircraft. Much of its strength was at Sorong and Babo. The Japanese army had airplanes on Noemfoor’s airfields as well as at its principal bases on Halmahera Island. Bases at Manokwari, Moemi and elsewhere were used on occasion.
Bad weather prevented major operations on May 2nd. Two B-24s of the 63rd BS got over Biak to drop 7 tons of bombs and met only slight AA fire. Despite the weather 85 sorties were directed against other targets. While western New Guinea would receive increased attention much of the 5th Air Force’s effort was still going against major Japanese troops concentrations elsewhere. This included Hansa Bay and Wewak areas as well as Japanese pockets of resistance in the vicinity of Tadji and Hollandia. On the 2nd there were two air alerts at Hollandia probably caused by Japanese army aircraft. Bombs were dropped and some damage and casualties inflicted.
Meanwhile Imperial General Headquarters revised the critical defense line considering the new realities:
- The line to be secured in the Western New Guinea area is designated as a line connecting the southern part of Geelvinck Bay, Manokwari, Sorong, and Halmahera.
- Strategic points on and in the vicinity of Biak Island will be held as long as possible.
- Necessary troops will be withdrawn to Biak from the Sarmi district as quickly as possible.[4]
B-24 Liberator Raids Against Biak
The 13th Air Force task force (5th and 307th BGs) took on the daylight mission against Biak. Over more than two weeks they mounted a series of major missions, taking a break on only two days to strike targets in the Caroline Islands. Regular small night raids by other units were a feature of this period as well. On May 4th twenty-six B-24s dropped 67 tons of bombs on targets at Biak. Of a reported dozen intercepting fighters one was claimed destroyed and a second probably destroyed. The Japanese reported nine Zeros intercepted and shot down one B-24.[5] The 380th BG was hitting airfields on the Vogelkopf Peninsula during this period.
The twenty-three 5th BG Liberators were over Biak on 5 May. They reported twelve to fifteen fighters intercepted. A Zero attacking in a split-S maneuver shot down Maj. Donald Cass’s Liberator. A damaged Liberator crash landed at Hollandia. The Japanese reported the B-24s in two flights of seven and thirteen bombers. Eight Sentotai 311 Zeros intercepted and expended sixteen 30kg aerial bombs, 1,500 twenty-millimeter rounds and 8,000 rounds of 7.7mm ammunition claiming one B-24 shot down and four damaged. One Zero was damaged.[6] The following day eighteen B-24s made the attack. Eight Zeros scrambled but only seven engaged. They claimed two B-24s, but none was lost and one Zero was severely damaged (a probable write off).[7]
P-40 Warhawks Battle Japanese Zeros Over Biak
On the 7th forty-five B-24s were escorted by twenty-seven P-40Ns of the 7th and 8th FS flying from Hollandia (Cyclops airfield). Seven Zeros scrambled. The bombers completed their bomb runs before the Zeros were able to intercept. Phosphorous bombs blossomed behind the bomber formation. The first two Zeros to make gunnery runs on the bombers were jumped by a flight of 8th FS Warhawks. Despite the presence of escorting fighters, the Zeros pressed attacks on the bombers. The Warhawks of the 7th FS made most of the claims against pilots one author called “some of the most aggressive pilots the [49th FG] would ever encounter.” [8] Bomber gunners claimed two interceptors. Fighter claims ran to three Zekes and four Oscars shot down in the target area with a Tojo claimed as a probable and a later claim for a Tony. Only one Zero returned to base after the combat. Pilots known to be killed were W.O. Sukemasa Kato and Chief Petty Officer Tsutomu Shibata likely the two pilots shot in their parachutes by Warhawk pilots.[9] These were the first 5th Air Force fighter claims since the big combat over Hollandia on 12 April when Capt. Richard Bong broke Eddie Rickenbacher’s World War I record for the destruction of enemy aircraft.
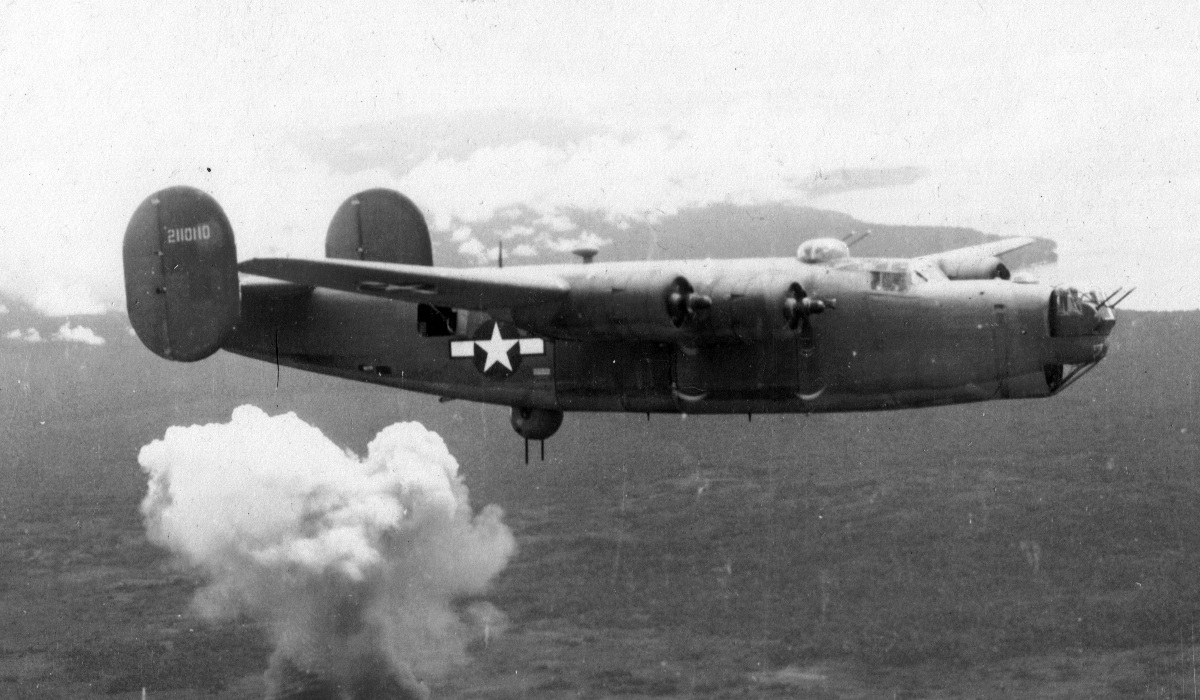
5th BG B-24 over Biak
The following day there was no aerial opposition over Biak. Bombing destroyed one navy medium bomber on the ground. P-40s found a small cargo vessel and a lugger to strafe. Barges and cargo vessels were active around Biak Island. Farther west half a dozen B-24s of the 380th BG attacking Jefman Island were intercepted by nine Zeros from nearby Sorong that claimed three Liberators. Bomber crews reported seeing two Nicks in addition to Zekes. One Liberator was shot down crashing into the sea. Two others suffered severe damage.[10] On the ninth seven Zeros were on reconnaissance looking for an enemy task force. North of Noemfoor they encountered six B-24s on patrol in the same area. The Japanese claimed two B-24s shot down. None was lost. Bomber gunners claimed one fighter damaged. The damaged Zero made a forced landing.[11]
A strange (garbled?) report stated several 4-engine flying boats had been detected at Wissel Lake, a large lake in a mountainous region of southwestern New Guinea. At the time Allied intelligence estimated the Japanese had only two large flying boats in Dutch New Guinea. On May 12th R.A.A.F. command sent seven Beauforts and six Dutch B-25s (Nos. 1 & 18 Sq.) to the rarely visited area. No flying boats were seen. A radio station, suspected machine gun positions and small boats were attacked. A Dutch Mitchell reportedly crashed.[12]
Japanese Air Raids Against Hollandia
The Japanese tried to dampen Allied operations from Hollandia. May 11/12, they sent eight rikkos from Air Group 732 on an eight hour mission from Sorong. The Japanese split into two groups. They expended their bombs and returned to base. Hollandia had an air raid alert, but no bombs were reported by the Americans. Six bombers repeated the mission arriving before dawn on the 14th. Japanese bombs fell at Humbolt Bay, Tanahmerah Bay and on two of the airfields. Allied reports account for only about half the 60kg bombs the Japanese carried. Damage was characterized as minor. A third attack on the following day involved only three bombers. Neither Japanese nor Allied reports verify bombs being dropped. A single aircraft attack three nights later apparently by an army bomber resulted in no damage according to some sources but caused extensive damage and casualties per other sources.[13]
At mid-month the Japanese navy’s 23rd Air Flotilla had only twenty-eight operational aircraft including twelve Zero fighters and six medium bombers. The 7th Flying Division had fifty-two operational aircraft most at bases on Halmahera. In western New Guinea were just thirteen Type 1 fighters of the 13th FR (Noemfoor) and five reconnaissance planes of 70th and 73rd FCs (Moemi).[14]
P-40s and Zeros Clash Near Noemfoor
Nine Zeros from Sorong intruded over the Geelvink Bay on 15 May. Headed toward Noemfoor were F-7s (photo B-25 Mitchells) and sixteen escorting P-40s of the 7th Fighter Squadron. Due to cloud conditions the Warhawks divided into two eight-plane sections. Two four-plane flights of Warhawks encountered the Zeros identified as eight Oscars and four Zekes approaching from head on and above. In the ensuing combat Warhawks claimed four Oscars and three Zekes. Two Zekes were claimed by 1Lt. Lewis Smith, his only victory claims. Two Zeros failed to return to base and two were damaged including one that made a forced landing. The Japanese claimed seven P-40s (one uncertain) and a B-25. No American planes were lost outright. “One of our fighters belly-landed with three feet sheared off the right wing by a falling enemy fighter; and one other also crash landed, a third was badly damaged.” Two pilots returned despite being wounded. One American pilot said the Japanese pilots were very eager and sharp and that the P-40s were lucky to suffer as little as they did.[15]
NOTE: A Japanese speaking WW2 aviation expert has advised me that “force landed” in a Japanese mission report is a remarkably flexible term. It might mean a water landing, a crash landing at base or a forced but possibly safe landing away from the home field. U.S. reports of “belly-landing” or “crash landing” may have implications not immediately recognized. A belly landing typically involves a bent propeller. This requires not only a propeller replacement but typically an engine replacement caused by engine damage transmitted via the propellor shaft. The engine is typically the most expensive single component of an airplane. This is in addition to other damage caused in the landing or damage which required the crash landing.
Allied Air Power Advances Toward Wakde and Noemfoor
In five days prior to invasion Wakde Island was subjected to 460 sorties and 1,100 tons of bombs. In the same period 270 sorties were flown against Biak and 570 tons of bombs dropped. Those were not the exclusive targets, however. On the sixteenth forty-one B-24s bombed Bosnek airfield on Biak. Seventeen B-24s bombed Kamiri airfield on Noemfoor escorted by sixteen P-38s of the 433rd FS flying their first mission from Hollandia. Two dozen aircraft were observed on the ground but only three Type 1 Hayabusa fighters managed to scramble. Two failed to return. Pilots 1Lt. Minoru Miyanori and Sgt. Mjr. Yukio Takamiya were killed. Oscars were claimed by Maj. Warren Lewis, 1Lt. John Purdy, and 2Lt. Howard Stiles.[16]
The following day five groups of B-24s hammered Wakde. Just seven B-24s, escorted by Lightnings of the 431st FS, hit Kamiri airdrome on Noemfoor. A few Type 1 fighters of 13th FR intercepted. Oscars were claimed by Capt. Thomas McGuire who was to become America’s second leading ace, Capt. William O’Brien and 1Lt. John Tilley.[17] Japanese radio announced three fighters failed to return. Killed were company commander, Capt. Haruki Nozawa and Sgt. Asao Nanjo. The victory was number 17 for McGuire and his first in 1944.
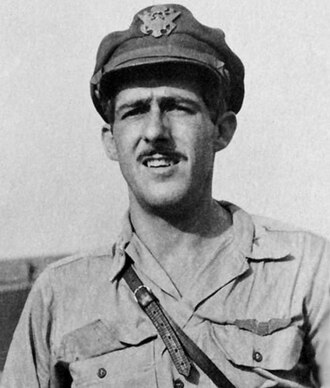
Capt. Thomas Mcguire
Wakde Island Falls to Allied Forces
Also, on the seventeenth came another American amphibious invasion. Jumping forward more than a hundred miles west of Hollandia the 163rd Regimental Combat Team landed along the north coast of New Guinea in the Arara-Toem region. Offshore Wakde Island received heavy air strikes. By the afternoon shore based artillery was firing on the island and a small islet south of Wakde airfield was occupied. The eighteenth saw troops land on Wakde proper. Japanese resistance was fierce but futile. By the nineteenth the island was secured and by the twenty-first U.S. fighters and transport planes were operating from the airfield. There was no Japanese aerial opposition. For background on Wakde see Japanese Operations at Wakde Airfield on Wakde Island on this website.
P-38 Lightnings and Japanese Fighters Over Manokwari
On 19 May twelve Zeros sortied from Sorong in three separate flights of four to provide cover to shipping in the vicinity of Manokwari. Two of the flights engaged American aircraft. Thirteen B-24s from the 380th BG made a rendezvous with eleven P-38s of the 9th FS over Japen Island and headed for Manokwari followed by additional Lightnings of the 431st FS. The bombers identified the eight fighters that intercepted after the bomb run as seven Zekes and an Oscar. Gunners claimed one as a sure victim and one as probable. Damage to one bomber was attributed to AA fire. The P-38 pilot reports identified their opponents as “Tojos.” Tojo victory claims were made by Maj. Wallace Jordan, Lieutenants William Baxter, Richard Kirkland, and Willie Treadway. An additional Tojo claim was made by Thomas McGuire when 431st FS Lightnings engaged the Zeros. In the two engagements the Japanese claimed three P-38s. None went down. Two Zeros were lost and two damaged, one severely. Earlier a dozen 8th BS A-20s attacked shipping at low level and effectively strafed Kamiri airfield unmolested. Escorting fighters shot down a float plane.[18]
Biak the next invasion target received over 2,200 tons of bombs during May. It received the bulk of attention over the next week with the 5th and 307th BGs leading the way. No aerial opposition was encountered. Many other targets continued to be hit; Manokwari, Noemfoor, Moemi, and Babo among them. The 13th FR was down to ten fighters at Noemfoor and Manokwari. Raids on Noemfoor on 21 and 24 May destroyed thirteen airplanes including five Hayabusas. The 5th FR had eighteen twin-engine fighters (sometimes referred to as “heavy fighters”) at Wasile and Samate. On 23 May S311 at Sorong had just four operational Zeros for its twenty-one available pilots. Twelve replacement Zeros were expected to arrive at Kendari by 25 May. The first elements of the 24th FR recently rehabilitated in Japan had arrived at Kau, Halmahera Island with Type 1 fighters to reinforce the 23rd Air Flotilla’s fighter strength.[19]
The Battle of Biak Begins
On 26 May the Biak invasion force was making its final approach to the landing site off Sorido airfield. Eight attack transports, eight LSTs, eight LCTs, and fifteen LCIs carried troops of the 41st Infantry Division as well as eighty-eight amphibious vehicles (LVTs and DUKWs). They were supported by several cruisers, more than two dozen destroyers and a variety of lesser vessels. Available at Sorong to oppose them were four Zero fighters of S311, eight Type 1 fighters of 24th FR, and one reconnaissance plane of T102 of the 23rd Air Flotilla. Five Type 1 land attack bombers of Air Group 753 had recently arrived, but they were needed for patrol missions and could not be used in daylight attacks without a substantial fighter escort. Several fighters of the Japanese army’s 13th FR were scattered at bases on the Vogelkopf Peninsula. The Type 2 two-seat fighters of the 5th FR were also scattered but several were at Samate in western New Guinea. Also, on the twenty-sixth an event took place that helps put the western New Guinea operations in perspective. Seven PB4Ys of the VPB-115 flew the first reconnaissance mission over the Philippines since 1942.
The Biak invasion fleet arrived offshore before dawn on the twenty-seventh. A stronger than expected current put the troop transports a mile or more farther west than planned. Otherwise, landings proceeded relatively smoothly. Initial enemy resistance was slight thanks to massive bombing by B-24s followed by attacking medium bombers and fire support from the fleet. An SOC observation plane from the cruiser U.S.S. Boise strafed and claimed a Topsy transport destroyed on Sorido airfield. Later in the morning an 8th BS A-20 hit by machine gun fire crashed south of Owi Island with two its crew rescued by a destroyer.[20]
Japanese Zeros Attack the Biak Invasion Fleet
It was nearly 1100 before any Japanese aerial response was noted. Fighter cover for the fleet was to have arrived at 0725. A weather front upset that plan. By 1100 P-40 fighter cover was ten minutes away. Popping up from Biak’s land mass where their approach had not been detected by radar came two Zero fighters. Some reports from units of the fleet say there were four fighters. The Amphibious Force report mentions two or three. The S311 Zeros expended three hundred 20mm rounds and seven hundred 7.7mm bullets claiming hits on various targets. One Zero engaged an SOC observation floatplane peppering the fuselage with hits and puncturing the main float and a wing float. The SOC landed and was recovered by its mother ship light cruiser U.S.S. Nashville about the same time that fighter cover arrived. H.M.A.S. Shropshire commended the plane (Nashville no. 2, Lt. Mills) for its direction of fire support. The Zeros quickly vacated the area. It seems likely their primary mission was reconnaissance.[21]
At Sorong RAdm. Yoshiaki Ito, 23rd Air Flotilla commander, learned he had a major invasion in his area. The two available S311 Zeros were ordered to attack with 30kg bombs and guns. The 24th FR Hayabusas provided the escort. The flotilla’s war diary states nine aircraft took part. It appears one of the 24th FR fighters failed to take off or returned early. Fifteen miles away across the sea at Samate on Jefman Island Maj. Katsushige Takada sentaicho of 5th FR also learned of the invasion. He had no orders from higher headquarters but decided to attack with the five Toryus available. The twin-engine Type 2 two-seat fighters were valued as interceptors and convoy escort was their staple but could also carry bombs. Only four of them made the 330 mile trip to Biak.[22]
At Biak by mid-afternoon 12,000 troops had been delivered as well as a dozen M-4 medium tanks, artillery, hundreds of vehicles and over 2,000 tons of equipment and supplies. As the afternoon wore on, unloading continued. Some first echelon ships were preparing to up anchor and leave the area. Fighter cover was being supplied by sixteen P-47D Thunderbolts of the 342nd FS, one four-plane flight at about 6,000 feet and another at 10,000 feet. Radar picked up bogies seventy-two miles to the northwest. The defenders were alerted.
Two Zeros attacked at low level from over the island targeting LSTs at the beach. Three of their four small bombs hit LST-456. None exploded. The normal attack method was a 45 degree dive with bomb release above 300 meters. The fuse used may have been the fault. One bomb hit the upper works and dented the plating. Another smashed into the ship’s boat, hit the hull and fell into the boat. The third hit dented and opened the hull plating and fell into the water. Brave and alert crewmen manhandled the unexploded bombs in the boat and upper deck into the sea. LST-456 remained fully operational. Nearby LST-452 had three crewmen wounded by strafing. Alerted anti-aircraft gunners on ship and shore fired on the attackers. One failed to return to Sorong.[23]
P-47 Thunderbolts Fight Over Biak
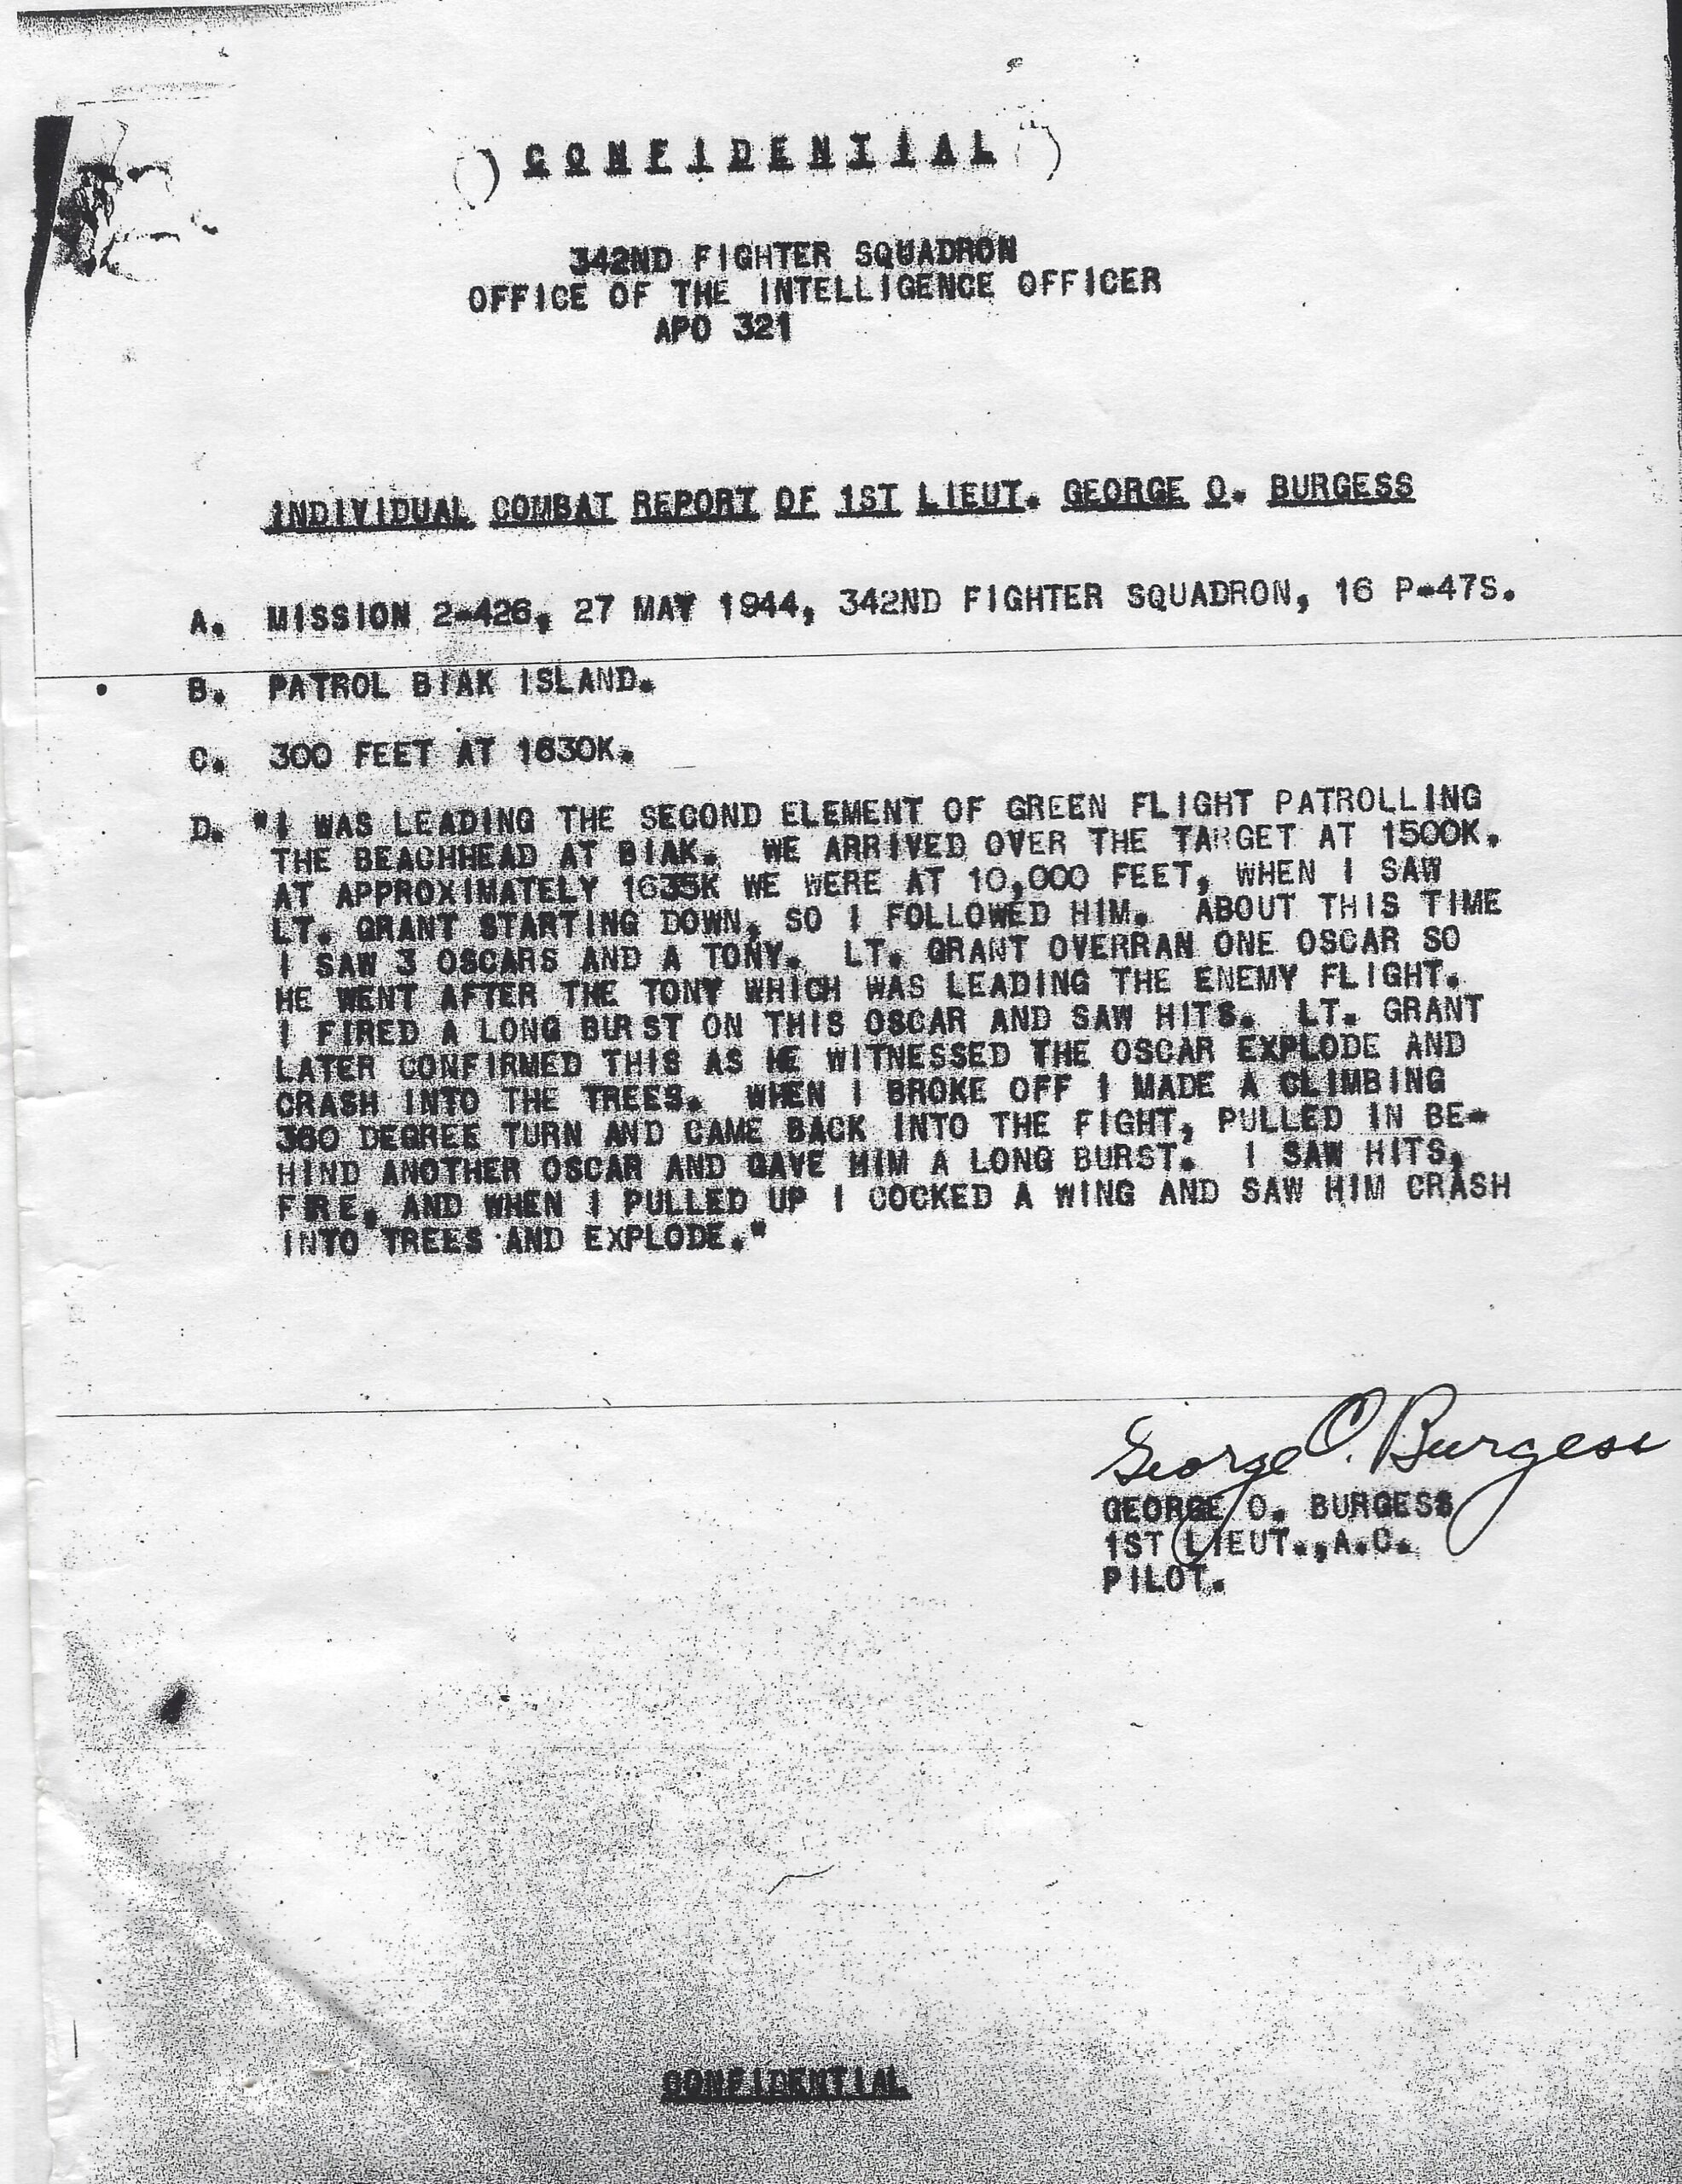
The Zeros’ escort flying at about 1,000 feet altitude was spotted by some of the Thunderbolt pilots flying above them. One enemy flight was reported as three Oscars with a “Tony” in the lead and the other as four Oscars. The Thunderbolts dove to attack. 1Lt. George Burgess claimed two Oscars. 1Lt. Marvin Grant claimed a Tony. Lieutenants Sutcliffe and Nickell each claimed an Oscar. Lost was 1Lt. Frankfort Wynans last seen chasing an Oscar. Many years later the wreck of his Thunderbolt with his remains still inside was found on Biak.[24] According to the 23rd Air Flotilla war diary five fighters were lost, exploded or failed to return. Known killed from 24th FR were 1Lt. Toshio Okabe, Sgt. Maj. Chukichi Matsumoto, and Sgt. Akira Kumagaya.
Conflicting Accounts of the Japanese Attack on Biak
As might be imagined, accounts of the attacks described in various reports contained many inconsistences and errors. Some attackers were identified as Val dive bombers. The twin-engine fighters were identified as Helen heavy bombers in high level reports. Key Japanese monographs even carry over heavy bomber terminology rather than “heavy fighter”. The sequence of events is presented incorrectly in some official histories with the Zero bomb attack confused with the army attack. The short version of what occurred: all four heavy fighters were shot down by anti-aircraft fire. One barely missed colliding with destroyer U.S.S. Sampson and crashed near SC-699. Wreckage damaged the hull, and a fire caused serious damage and casualties. Personnel casualties included two killed. The ship was temporarily abandoned but saved by heroic firefighting efforts. Despite the damage the vessel was subsequently repaired and returned to service.
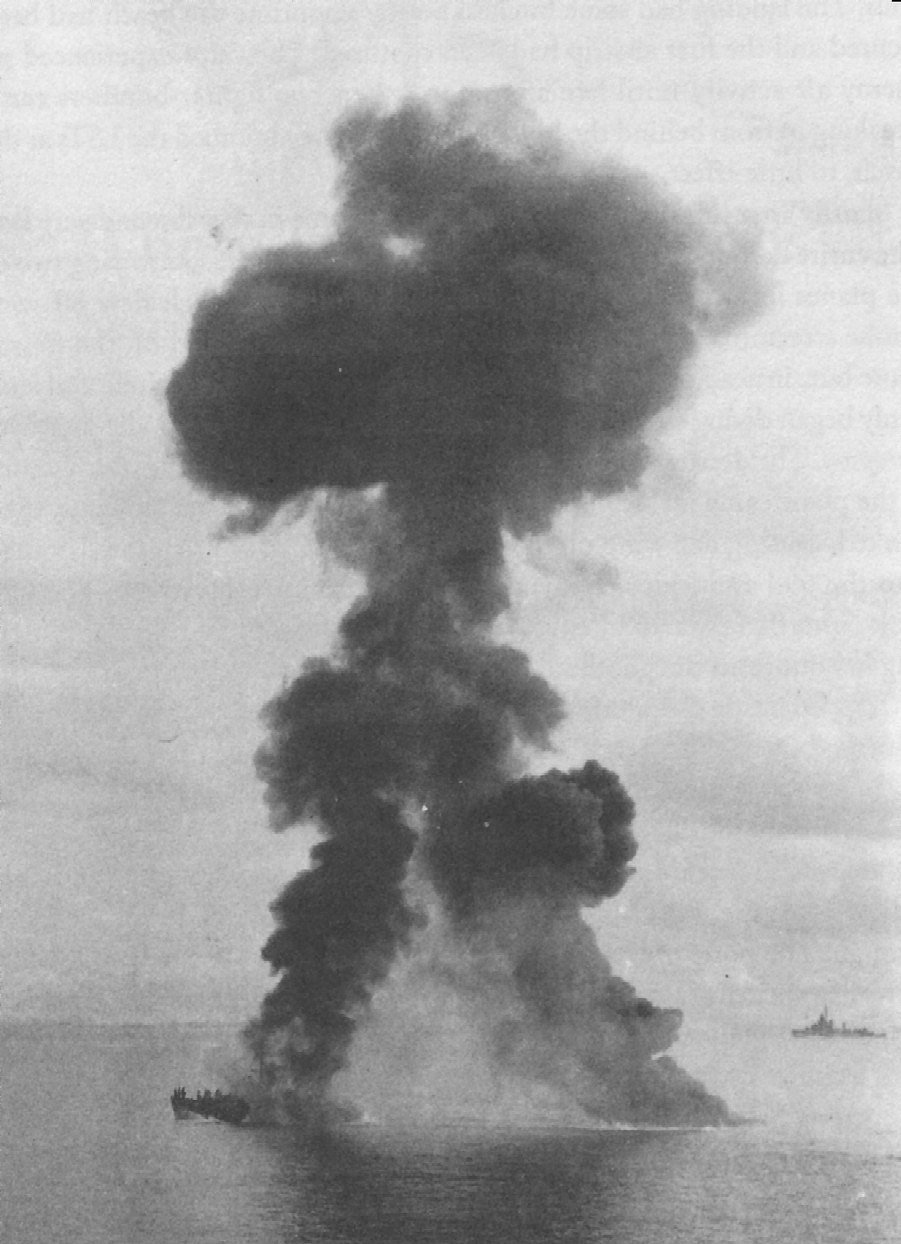
SC-699 burning and fuel fire
The best account from the Japanese perspective is contained in intercepted 7th FD messages more than a week after the attack. Partially paraphrased below with deletion of some particularly bizarre assertions is the essence of those messages. From internal evidence the sources of information include Maj. Takada’s back seater Sgt. Maj. Toshio Motomiya and surviving pilots of the of the 24th FR.[25]
Major Takeda Katsushige (Term No. 46) 5th Hikosentaicho received an urgent report of enemy landings on Biak Island on May 27th and on his own initiative he commanded an attack unit of 4 two-seater fighter planes, used to defend strategic points, and attacked enemy ships in that vicinity…
They advanced from the sky above Mokmer at 1535 at an altitude of 180 meters. The plane of the Sentaicho made a direct hit on a cruiser and caused it to trail black smoke, he then bombarded a destroyer. Just then the plane was hit in the __ motor…but as it left the fray the right motor (caught fire?) and it seems the squadron commander was hit again. He went into a quick dive and crashed into the sea 60 kilometers east of Noemfoor.
Kudo’s plane [Sgt. Takehiro Kudo] seems to have been hit at the time of the first attack. It became a ball of fire, and crashed into a cruiser. There are indications that this cruiser burned and sank.
Okabe’s plane [Lt. Toshio Okabe] plane was also hit by the enemy at the same time, and, wrapped in black smoke, it crashed into a destroyer. The aforementioned ship was seen to list immediately and sank by the stern.
Matsumoto’s plane [Sgt. Maj. Chugo Matsumoto], according to pilots of the 24th Hiko Sentai, crashed into enemy shore positions after repeatedly heavily bombarding enemy warships and landing units.
Motomiya was thrown clear of Takeda’s Toryu when it crashed. He floated in an unconscious state before eventually reaching shore. He returned to tell the tale including bizarre embellishments such as Takeda engaged and shot down two P-47s in his damaged heavy fighter. The Thunderbolts, involved with the escorts, low on fuel, never fought Takeda’s fighters and quickly left the area. Except for Wynan’s, the P-47s all returned to base.
General Hisaichi Terauchi, commander-in-chief of Japan’s Southern Army issued a citation that included the phrase “fired with the firm determination to destroy one warship with one plane and in defiance of anti-aircraft gunfire repeatedly launched death-defying attacks against the enemy sinking two cruisers and damaging two others, and all his heroic men self-blasted.” The Emperor was subsequently informed of the citation.[26]
In the final days of the month American air attacks continued sometimes encountering Japanese fighter opposition at Babo and other targets. Over Biak on the 29th P-47s of the 342nd FS encountered a Japanese navy strafing raid and claimed two Zekes and an Oscar destroyed. All four Zeros failed to return. Later confirmed as killed were W.O. Shinji Ishida and Petty Officer Tadashi Goto. A night mission by navy bombers claimed hits and sinkings of Allied ships but resulted only in loss of five rikkos and damage to others. On the last day of the month a Zero was lost intercepting heavy bombers over Babo. Air Groups 732 and 753 carried out a joint attack against Biak causing little damage while losing one bomber with another heavily damage.
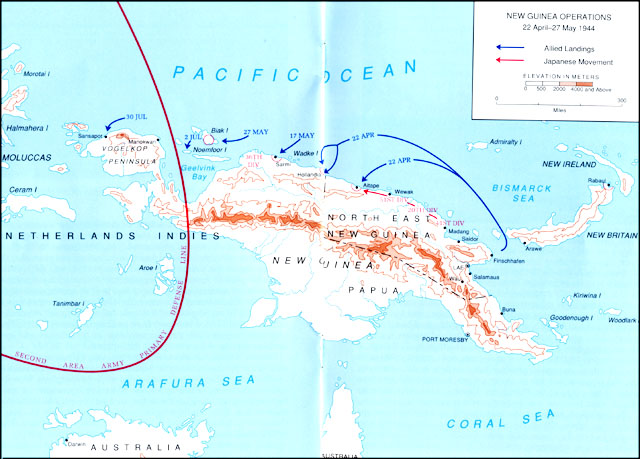
New Guinea operations April-May 1944
Operation Kon and the Japanese Response to Biak
The character of the air war changed again. No longer was western New Guinea isolated from the larger strategic picture in Japanese eyes. Operation “A-Go” aiming for a decisive battle in the Pacific had been the works since early May. In conjunction with the army the “Kon” operation was decided. The navy would deliver an army amphibious brigade to Biak to hold and retake the island. The navy directed air reinforcements to support the operation. The 23rd Air Flotilla’s strength (2 fighters, 4 rikkos at Sorong; 10 fighters, Babo; 6 fighters, Kau; 8 rikkos Wasile) was to be built up to its prescribed strength of 168 aircraft. By the end of the month eighteen fighters and twelve land bombers had been arrived at Wasile on Halmahera. Another seventy-six aircraft then en route from the central Pacific and Japan.[27] The 22nd Air Flotilla was earmarked to supplement the 23rd in the area. “Kon” ground reinforcements were repeatedly delayed. The Biak battle was protracted but unsuccessful for the Japanese.
Western New Guinea and the Road to the Battle of the Philippine Sea
The Americans landed on Saipan on 11 June, and the epic Battle of the Philippine Sea commenced on 19 June. Prior to the “decisive” battle substantial elements of the land based air power devoted to “A-Go” had been diverted to the “north of Australia” area. There it engaged in frequent operations. Losses were suffered in combat, due to incomplete facilities, illness among aircrews compounded in some cases by inadequate training with new aircraft (Suisei dive bomber, Ginga land bomber). The balanced force involving land based air power as well as powerful carrier based units was disrupted before the big battle ever began. Some of the recent reinforcements were recalled to the central Pacific having seen little or no action.
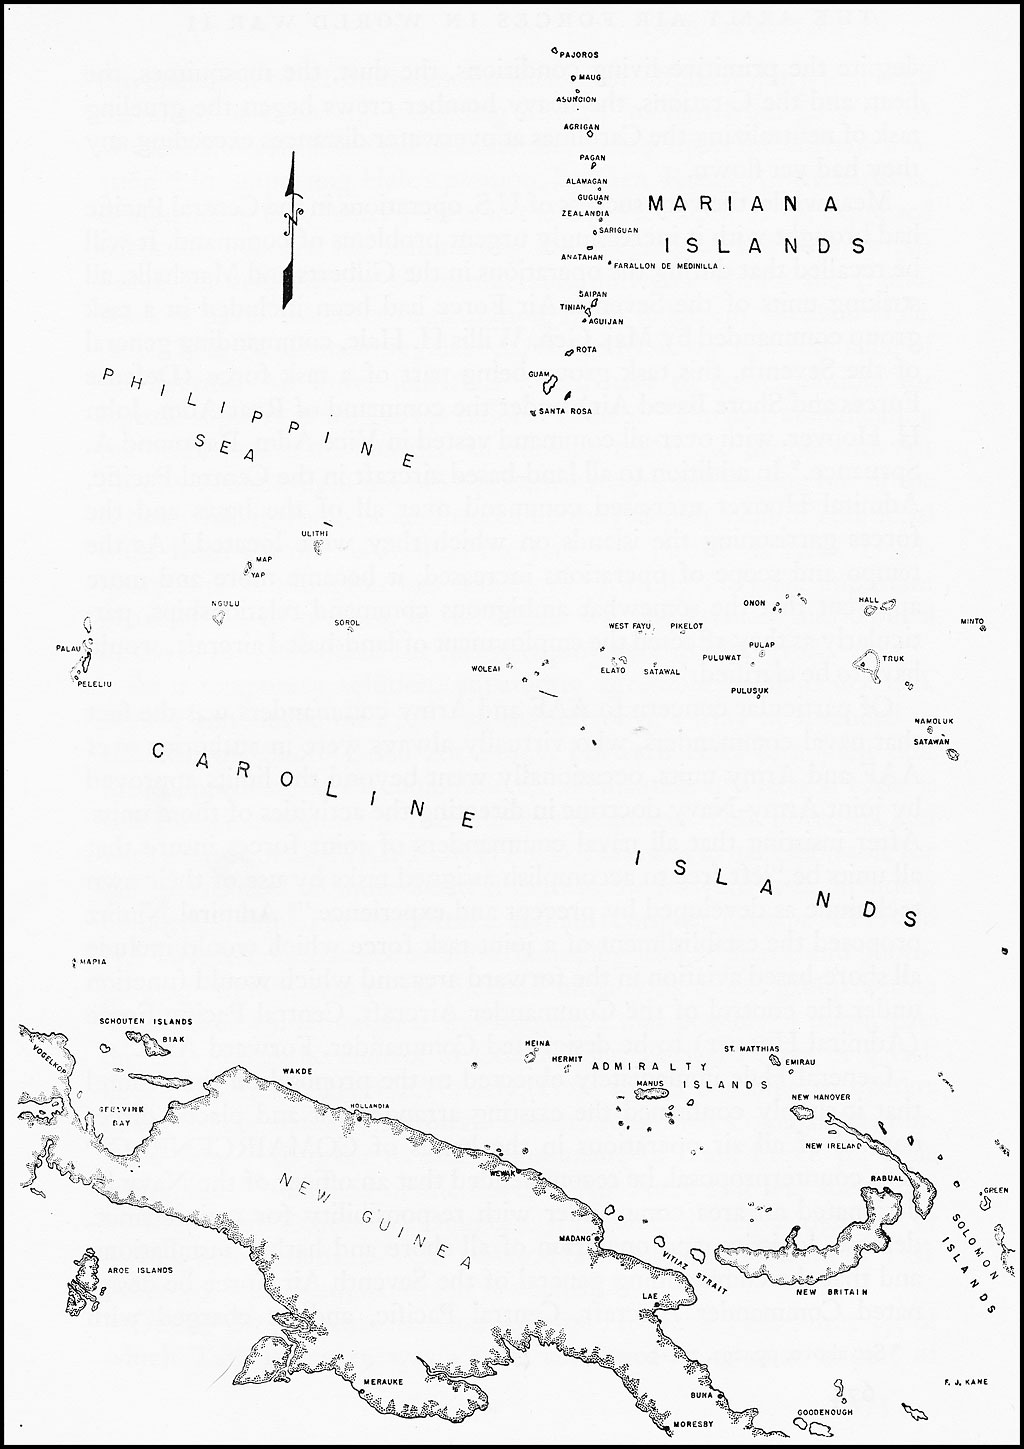
Pacific Battlefield May 1944
Operations during June inflicted losses on the Japanese. They repaid in kind on several occasions. The most spectacular event came on 5-6 June. Reconnaissance sighted large numbers of enemy aircraft crowded on Wakde’s airfield. Ens. Isao Sunayama led three Air Group 732 rikkos against that target. One bomber attacked Biak. The other two continued to Wakde and found dozens of aircraft lined up along the runway. Each bomber released a string of bombs on a column of aircraft lining either side of the runway. Photo reconnaissance after the attack noted nearly eighty aircraft destroyed or damaged. The Domei press account reported eighty aircraft destroyed with additional damaged aircraft bringing the total to one hundred. American figures admit only six aircraft destroyed with dozens of others damaged including many navy 4-engine PB4Y patrol bombers.[28]
Footnotes:
[1] Seventh Fleet War Diary, May 1944. When a Japanese aircraft is identified by an Allied codename the identification comes from an Allied source. When a Japanese designation is used the source is Japanese.
[2] Aircraft Action Report, ACA, VB-106 (1 May 1944). The account on the ACA form takes more than a full page.
[3] 23rd Air Squadron Battle Diary (WDC No. 160158), p.3.
[4] Records of General MacArthur Vol. II, Pt. I, U.S. Army (1966/1994) p. 274 citing Imperial General Headquarters Record.
[5] War Department Daily Report via FDR Library digital archives; 23rd Air Flotilla war dairy (note 3).
[6] Ibid.; Kodochosho (mission report) Air Group 153 (5 May 1944); MACR 5083.
[7] Note 4 ibid.; Kodochosho for 6 May 1944.
[8] Ferguson & Pascalis, Protect & Avenge, Schiffer, Atglen PA (1996) p. 247.
[9] Notes 4 and 7 ibid., Kodochosho for 7 May 1944
[10] Note 4 ibid.; Hata et al, Japanese Naval Fighter Units and Their Aces, Grub Street, London (2011), p. 398.
[11] U.S.N. Japanese Naval Activities (11 May 1944) via FDR Library digital archives; war diary (note 3).
[12] U.S.N. note 10 ibid. concerning report and attack details.
[13] War Department Daily Reports; Air Group 732 Kodochoshos; Ferguson (note 8) p. 250.
[14] Western New Guinea and North of Australia Area Naval Operations (April-September 1944), Japanese Monograph No. 87, p.8; Izawa, Rikko and Ginga, Eng. lang. unpublished manuscript, n.d., p. 176 (copy in possession of author); 7th FD msg. # 2659, 15 May/0230 (translation). Under 7th FD jurisdiction were two dozen aircraft of 6th FD but some such as 208 FR had insufficient crews to properly man the aircraft. 7th FD msg. 2320, 17 May/2320. The Japanese were evacuating aircrew stranded at Wewak by air as late as 13 May.
[15] Note 8 ibid., pp.250-251; Note 3, p. 4. Quote from SWPA Air Force Intel Summary No. 211 (5/27/1944).
[16] War Department Daily Report (note 5); ATIS Bull. 1318 (Item 13473); USAF Historical Study No. 85.
[17] Ibid.; Japanese radio report per SWPA Air Force Intel Summary No. 210.
[18] 380th BG FEN 19 mission report (May 1944); Air Group 153 kodochosho (19 May 1944); War Department and U.S.N. reports; 23rd Air Flotilla war diary; Ferguson & Pascalis pp. 253-254 as cited above.
[19] Air Group 153 msg. 23 May/1302; 7th FD msg. 2908 (27 May1944).
[20] Details of Allied actions and observations come from the Seventh Amphibious Force operation report as well as operation reports and war diaries of various units involved.
[21] Air Group 153 Kododchosho for 27 May mission (0720-1150 hrs.)
[22] Monograph 87 (note 14), p.9; Hata et al, Japanese Naval Fighter Units and Their Aces, Grub Street, London (2011), p. 46.
[23] Air Group 153 Kododchosho for 27 May mission (1330-1810 hrs.); Operation reports for vessels involved.
[24] Individual combat reports for officers named; 1Lt. E.F. Wynans profile on Pacificwrecks.com.
[25] 7th FD staff msg. No. 3111, 5 June 1944/2400 (Translations SRF 49234-5) and 7th FD staff msg. No. 3158, 8 June 1944/2400 (Translation SRF 49233), U.S. National Archives RG 457, Entry 9012, Box 56.
[26] Nippon Times, eng. lang. version (26 July 1944).
[27] Monograph No. 87 (note 14), p. 12; see generally monographs No. 90, The “A-Go” Operation May-June 1944, and No. 91 supplement thereto.
[28] Izawa, Rikko and Ginga (note 14) p.177; Greater Asia, eng. lang. newspaper (6 July 1944)